In this article:
This article will walk you through setting up R1Soft on your dedicated server.
These are instructions for systems running linux; if you’re utilizing a Windows server or a virtual machine, please check out our additional resources article here.
Setting Up a Protected Machine
In order to set up R1Soft on your dedicated server, you’ll need to login to Take2Hosting’s R1Soft server and set up your machine as a protected machine.
- Click on the URL below and login with your username and password:
https://r1soft.take2hosting.com
If you’re having trouble logging in or you don’t know your username & password, simply open a chat with our tech support and they will assist you with getting access to your account. You can chat in from our homepage at https://wwww.take2hosting.com. - Click on “Protected Machines” and “+New Machine”. This will bring you to the page below, where you can fill out the corresponding information for your server:
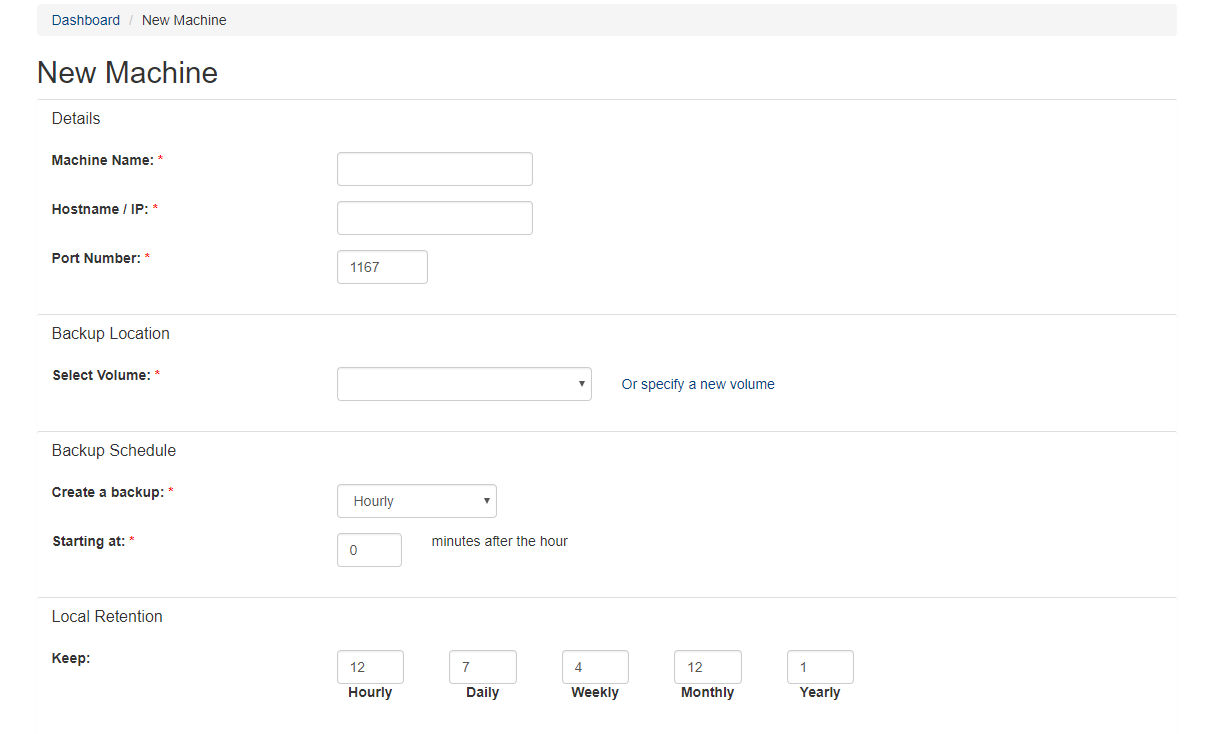
 Once you’re finished, click “Save”.
Your dedicated server should now be set up as a protected machine.
Deploying the R1Soft Agent
R1Soft’s agent must be deployed to any protected machine before a backup can be made.
- Click on the “Actions” cog next to your protected machine and select “Deploy Agent Software”. The popup box below will appear:
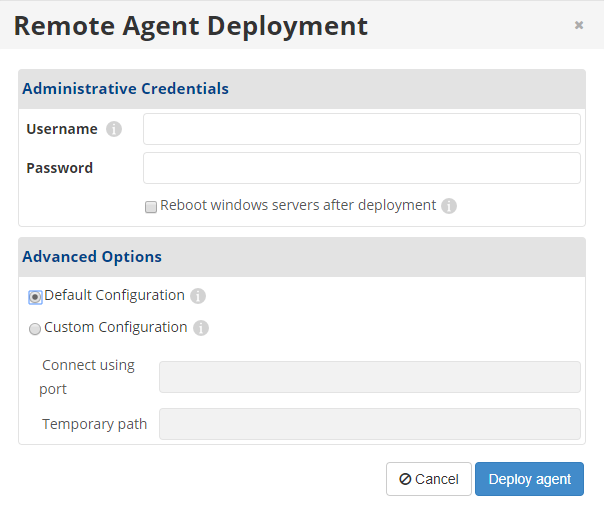
- Enter the root user & password for your dedicated server. If you’re utilizing a firewall, you must either open port 22 or use the “Custom Configuration” box and specify an open port. Then click “Deploy Agent”.This should begin the installation process for R1Soft on your server. If the installation fails, it will trigger an alert on your profile. You can open the alert and view the logs to discover more information regarding the error. Additionally, you can always submit a ticket or chat in to our 24/7 technical support in order to receive assistance in resolving any errors you may encounter.
Creating Your First Backup
In order to create your first backup, the R1Soft agent must already be deployed to the machine.
- Click on the “Actions” cog next to your protected machine and select “Backup Now”. A popup box will appear that displays the status of the backup. Even if you close the popup, it will not interfere with the backup process. If a backup fails, it will trigger an alert on your profile. You can open the alert and view the logs to discover more information regarding the error. Additionally, you can always submit a ticket or chat in to our 24/7 technical support in order to receive assistance in resolving any errors you may encounter.
Next Step
After you’ve set up your dedicated server as a protected machine, deployed the R1Soft agent, and created your first backup, you should be able to use that backup (or any backups created after it) to restore your information at any time. In order to find additional steps regarding how to restore a backup from R1Soft, check out our article here.